Everyone loves taking photos with their smartphones. iPhones and iPads being the world’s most popular Apple products, users of these products certainly take a lot of photos for posting on the social networks and for personal use. However, not all photos come out ‘picture perfect’, rather they might have plenty of issues. If the framing is correct and there’s no major issue like a hazy photo, out of focus or blurred scene then most of the issues with a digital photo can be fixed with native and third-party apps in iOS platform. Rotate, straighten and crop functions are some very basic features of photo editing and we have explained how you can do these on your iPhone or iPad.

How to Rotate Photo on iPhone, iPad or iPod Touch
The user can rotate a photo using the Photos app in iOS platform and no third-party app is required for this operation. Do the following steps to rotate photo on iPhone using the native Photos app:
- Swipe left and right in the home screen and find the Photos app on your iPhone or iPad.
- Tap the icon to launch Photos app.
- Once you are inside Photos app, navigate through your camera role and open the photo that you want to rotate by tapping on it.
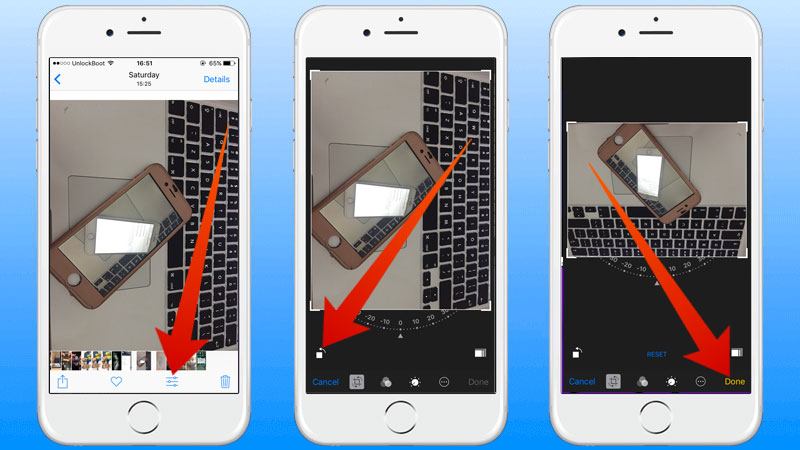
- On the bottom bar, tap on the button that looks like horizontal equalizer sliders.
- The screen blacks out, and you should find a ‘Crop’ button in the bottom pane. Tap on it.
- Similarly, now tap on the ‘rotate’ button, which is supposedly located at the bottom left corner.
- Using the button with a box and a left directing oval shaped arrow, you can rotate a photo. Keep tapping until the photo rotates to the direction you want.

3 steps to Rotate Photo on iPhone without app
Tap ‘Done’ to save the resized photo.
How to Straighten Photo using Photos App on iPhone or iPad
The procedure is very similar to rotating a photo. It is the same method, you only need to use a different button at the last step.
- Open the Photos app.
- Find your desired photo using the Photos app inside your Camera Roll. Tap on the photo to open it.
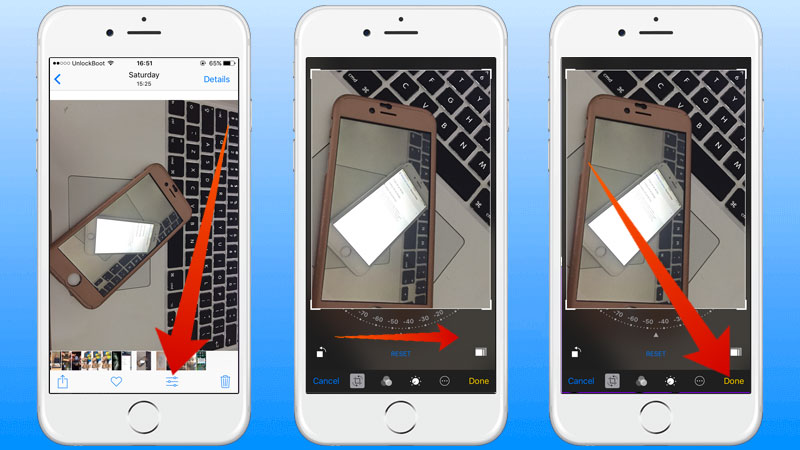
- Tap on the same equalizer-ish button. Tap on Crop.
- On the blacked out screen with the photo, you should find a circular scale on the bottom side of the photo. By slightly shifting your finger towards the left or the right, you can straighten a photo on your screen.
- To get a perfect balance, you might have to repeat the step few times.

3 steps to Straighten Photo on iPhone without app
Tap ‘Done’ to save and use the new image.
How to Crop Photo on iPhone, iPad or iPod Touch
We have been working with the rotation and straightening operating through the Crop menu, thus it will not be very difficult for you to now crop a photo. Do the following steps to crop photo on iPhone easily:
- Open Photos app and find your desired photo through the methods that we have shown.
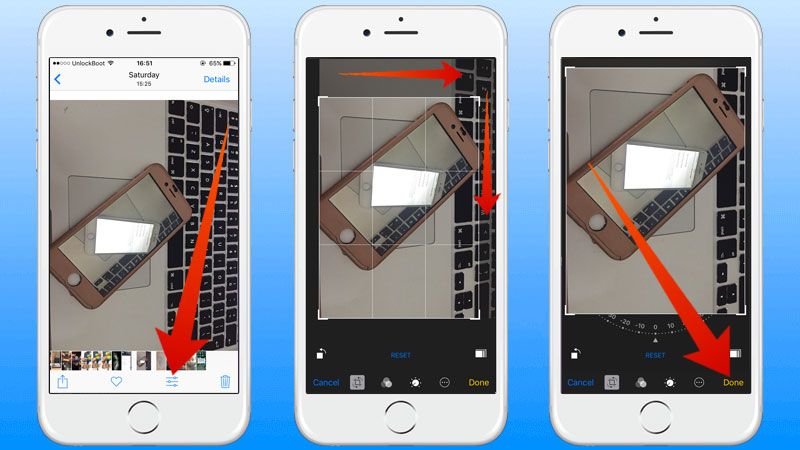
- Find the Crop button like the previous operations.
- Instead of tapping any button in the bottom pane, tap on the corners of the box overlay on the photo. Drag down to your desired size.
- If you are satisfied, tap ‘Done’ in the bottom pane.
- Your photo should now be cropped.

3 steps to crop photo on iPhone without app
Conclusion
Rotate, Straighten and Crop operations are all part of the Crop feature on your iOS device. Once you get a grip, you shouldn’t find any difficulties doing so.


![30 Best Cydia Repo Sources For iOS 16/15/14 Jailbreak [2024] best cydia sources 2020](https://cdn.unlockboot.com/wp-content/uploads/2020/06/cydia-sources-13-100x70.jpg)