One thing that can be annoying with iPhone is the same default mainstream ringtone ringing around everywhere. Although the default options help create a common ground for branding, these sort of things is not something that everyone agrees with. Quite often or not we’ve had to look into our pockets to see if the ringtone’s not coming from your phone only to see someone besides pulling out their phone. That’s where a little differentiation will help over. Read on to know how to create custom ringtones for iPhone easily.

We here would be looking into different ways of creating custom ringtones for your beloved iPhone and list out the easy picks among them. Join in as we start off our course.
Get Custom Ringtones for iPhone from iTunes Store
ITunes, the best option for music streaming is one of the top picks for customized ringtones. The iTunes Store has a plethora of things of which ringtones are a hot cake. The ringtones are sold via its iTunes Store for iPhone.

Add ringtones to iPhone from iTunes Store
All you need to do is just go through the iTunes Store and select the ‘More’ option followed by ‘Tones’. It will bring you to a wholly dedicated section of ringtones which can be bought for. These ringtones are can vary from songs to the sound effects as per your desire.
The ringtones are sold for mere 99 cents or to a little uppish at $1.29.
Create Custom Ringtones for iPhone Without iTunes
Well, the world loves the DIY approach, don’t they? The ‘Do It Yourself’ slogan works charmingly well here too and is quite an option to have if you don’t want to spend your pennies on buying ringtones from the iTunes Store.
This approach uses either video like that of YouTube videos and converts them into a ringtone. That way you can select the ringtone as per your liking. This takes just a few steps and in the end, we’re presented with an appealing ringtone. Below are the steps to create custom ringtones for iPhone easily:
Step 1: First Copy the link or URL of the YouTube video onto your clipboard.
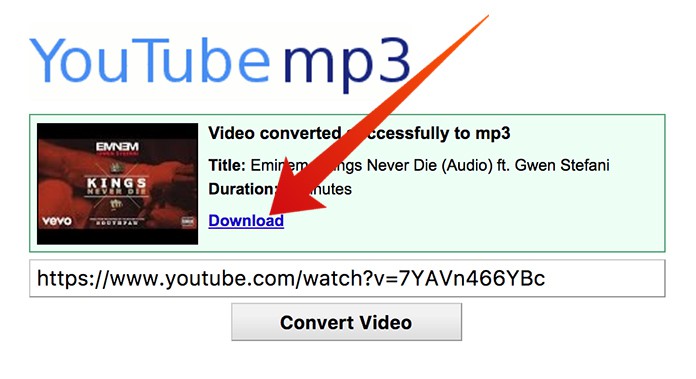
Step 2: Move over to MP3Converter.net and proceed to paste the URL onto it. Then select the option of ‘Convert Video’. After the conversion is done, you can download the MP3 to your computer for further usage.

Download Ringtones for iPhone from your Computer
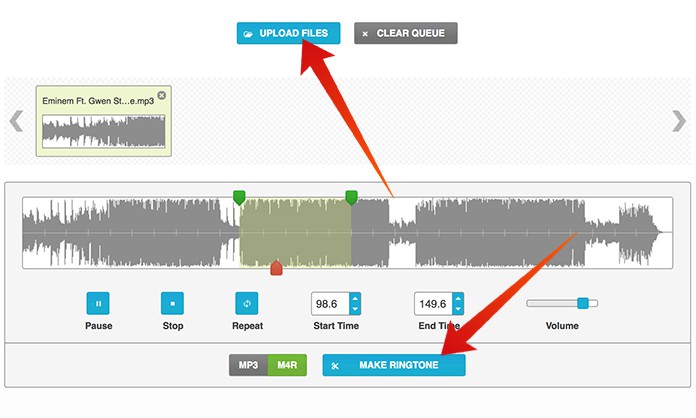
Step 3: The next step involves transforming the mp3 file into a ringtone based M4R format. Look over to any free conversion sites and proceed to convert the MP3 into M4R by uploading the file onto the site and selecting your parameters for conversion.

Create custom ringtones for iPhone online
Step 4: After the conversion is done according to the parameters set by you, all you need is to download the same. Just make sure you download the file as ‘Download for iPhone’.
Step 5: Sync your iPhone with the computer and operate iTunes on it. You can then select the Tones choice for your phone and then sync the tones. You’ll now have those Tones synced on your iPhone. You can then go to Ringtones under the Sounds Column of settings to lay hands on these great ringtones.
What’s our view?
Well, the iTunes Store option is definitely a quicker one but it costs dime a dozen. While the DIY approach takes time but doesn’t require pennies to be paid out of your pocket. It’s often up to an individual on how they perceive either of time or money.
That’s all from us on this one. We’ll be back with another one. Adios.


![30 Best Cydia Repo Sources For iOS 16/15/14 Jailbreak [2024] best cydia sources 2020](https://cdn.unlockboot.com/wp-content/uploads/2020/06/cydia-sources-13-100x70.jpg)