In the popularity ranking of gaming console emulators, the Nintendo DS emulators dominate the web in higher numbers and a lot of different developers have come up with different approaches to making Nintendo DS console games run on an iOS device. Follow this guide to easily download iNDS emulator on your iPhone running iOS 11.

If you own a latest iOS device e.g. an iPhone, iPad or iPod Touch that’s released within the past 2 years, they should pack sufficient power to run a Nintendo DS emulator on iOS 11 without any jailbreak. We have tested the case with iNDS Emulator for Nintendo DS platform on iOS 11, and laid out the step-by-step description for you.
Download iNDS Emulator for iPhone – Compatibility
iNDS Emulator has been tested to work on iOS 11 which is the latest version out right now. However, older versions like iOS 8 and iOS 9 are supposed to work flawlessly too. You can follow the guide below to download iNDS emulator for iPhone easily.
Steps to Download iNDS Emulator on iPhone running iOS 11
The steps for installing iNDS emulator on iOS 11 devices are described below:
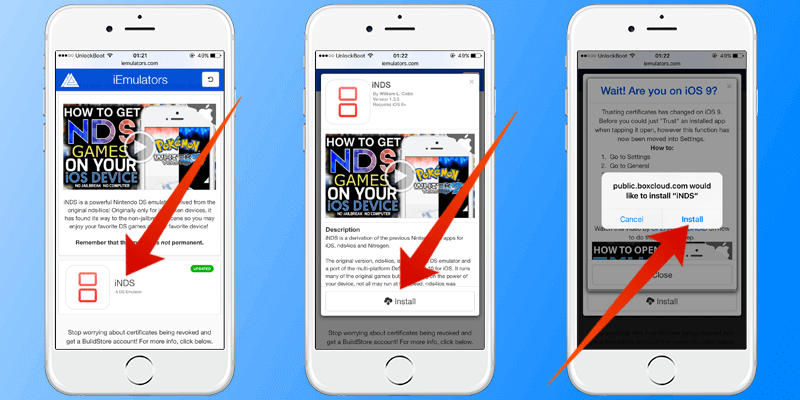
Step 1: The installation file for the iNDS Emulator needs to be downloaded into the iOS device directly using a web browser. Launch Safari and go to the URL iemulators.com/inds in the address bar. Hit ‘Go’ and wait for a while.

Step 2: The iNDS emulator download and installation page should open. Find the iNDS logo by scrolling down in the page, and tap on the icon. If you can’t find it – look for the text ‘A DS Emulator’ and tap on it. The text is placed as an icon.
Step 3: A new window should be brought up on the screen with an Install button. Tap on ‘Install’ and check if the download has begun. After a while, iOS would prompt for permission to install ‘iNDS’.
Step 4: Grant the installation by tapping on ‘Install’.
Step 5: The installation procedure of iNDS Emulator would now being on your iOS device. The process will take some time. App icon for iNDS Emulator would be placed on the home screen, greyed out showing the installation progress – just like any other app installation in iOS.
Step 6: The installation should finish within few minutes, however the app won’t run straight away. Since the download source is an unknown and uncertified location, the user needs to manually certify the download source.
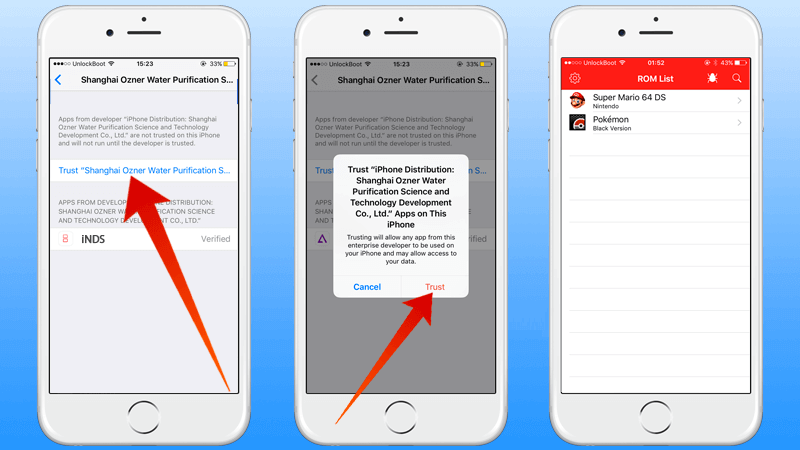
Step 7: To validate the profile, launch the Settings app and go to General -> Profiles & Device Management. In some older versions of iOS, this navigation may be in this way Settings -> General -> Device Management or Settings -> General -> Profile.
Step 8: Find the iNDS title and tap on Trust. Tap Trust again when the permission confirmation prompt shows up.

After you have completed all the steps above, you can launch the iNDS Emulator for iOS from the home screen of your iOS device.
https://www.youtube.com/watch?v=9y6jB24XNDE
If iNDS Emulator for iPhone Installation Fails
There may be times when the installation or certificate validation process might halt. In such cases, sideload the iNDS Emulator app to your iOS device using Cydia Impactor. You will need the IPA files for iNDS Emulator in that case.
Conclusion: Right after the installation process in the way we have shown it, the iPhone user would be able to start playing their favorite Nintendo DS games.


![30 Best Cydia Repo Sources For iOS 16/15/14 Jailbreak [2024] best cydia sources 2020](https://cdn.unlockboot.com/wp-content/uploads/2020/06/cydia-sources-13-100x70.jpg)