The new iOS 11 brought changes with it, one noticeable change was the camera picture format. Now, the default camera picture format is the HEIF format instead of the JPEG format. However, other iPhone users still prefer JPEG as their default camera format. As the JPEG format offers much more flexibility, compatibility and shareable among many devices. Find out how you can shoot JPEG Pictures in iOS 11.
It is a fairly an easy one-step method to change your iPhone camera default picture format, in order for your iPhone to snap pictures in JPEG format rather than HEIF format. And as a bonus, we are also throwing a simple trick to convert the HEIF image to JPEG automatically; when transferring the images to your PC or Mac. Hence, you don’t like to change the current iOS 11 default iPhone camera picture format.
This new iOS 11 default picture format, is specifically updated for iPhones which have the newer version of the cameras. The HEIF format, High-Efficiency Image Format, is saved as the .heic extension file. This extension makes possible for a greater file compression, as result the HEIF image size will be lesser than the standard .jpeg extension. At some instances .heic storage capacity can be half the storage of a .jpeg file. But the HEIF does not share the same compatibility as a JPEG file and you can easily share the JPEG file among users. So if you want to use HEIF or JPEG as the default iPhone camera image format is totally up to your preference.
How to Shoot JPEG Pictures in iOS 11 with the iPhone Camera
Note: The HEIF format is supported by the newer iPhone and iPad models. So if you do not notice this format available on your iPhone or iPad after updating to iOS 11, it means that your default camera settings are set to take pictures in JPEG format. Therefore, you do not need to read on. But, if your iPhone is taking images in HEIF format, please read the following guide on how you can Shoot JPEG Pictures in iOS 11.
Open the Settings app > Go to Camera > Select Formats > Under Camera Capture Select Most Compatible.
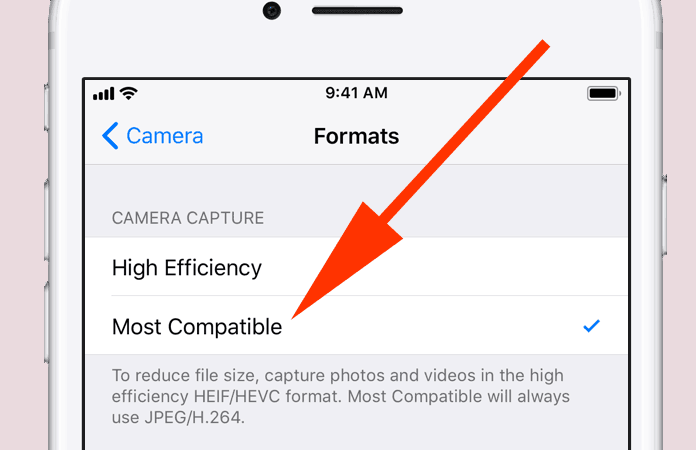
Now exit the Settings app.
Enabling the ‘Most Compatible’ option will ensure that the iPhone or iPad will take pictures in JPEG format, store the pictures as a JPEG file, and when transferred they still remain in the JPEG file format.
Read Also: How to Enable Camera Level Tool in iOS 11
Nonetheless, you can convert the .heic files manually to JPEG format or if you wish to another format.
How to Change HEIF to JPEG When Transferring Files
Read the following guide to understand, how you can take pictures in HEIF file format and automatically convert them into JPEG file format when transferring:
Go to Settings > Camera > Formats > select High Efficiency.
It will enable iPhone to take shots in the HEIF format.
Next, in order to transfer HEIF format as JPEG format:
Go to Photos > Under Transfer to Mac or PC option > select the Automatic option.
Thus, has to enable the automated process of converting a HEIF image file to a JPEG file when transferring it from iPhone or iPad to a Mac or PC.
Let us know in the comments which format you prefer to shoot pictures? Either you can shoot HEIF or shoot JPEG pictures in iOS 11.




![30 Best Cydia Repo Sources For iOS 16/15/14 Jailbreak [2024] best cydia sources 2020](https://cdn.unlockboot.com/wp-content/uploads/2020/06/cydia-sources-13-100x70.jpg)