If you have a Microsoft account or a PC user then you must know that their cloud storage system is called OneDrive. Hence, it comes pre-installed in most of the Windows devices. It is a great alternate to Google Drive and Dropbox. You can use OneDrive to sync all you docs, photos and videos on the cloud. However, if you don’t found it as your cup of tea, you can surely uninstall OneDrive from Windows 10.

Uninstall OneDrive from Windows 10
In order to uninstall OneDrive from Windows 10, fastest and the simplest way, is from the Settings app.
Step 1: Go to the Settings app either from the Start Menu and then selecting the settings button. Or you can use the shortcut key Windows + I. From the Windows Settings go into the Apps option.
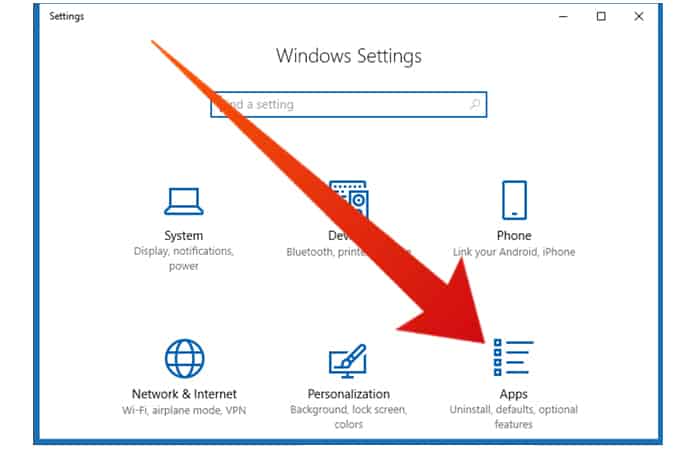
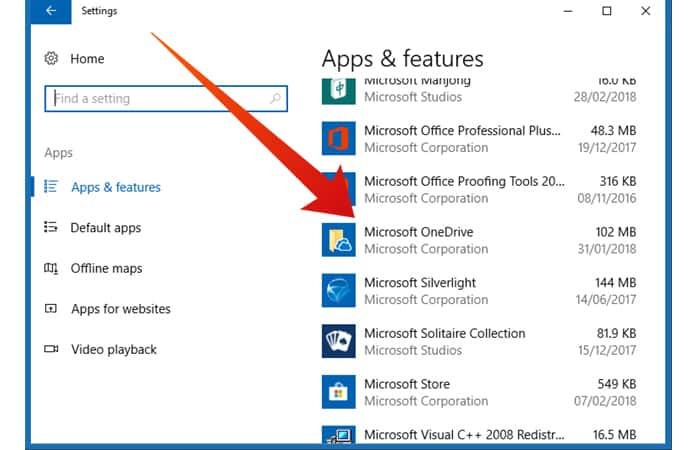
Step 2: Then you will have to wait for a while till your system loads up the list of installed apps. Now just scroll your way till you can locate the Microsoft OneDrive app, so that you can uninstall OneDrive from Windows 10.
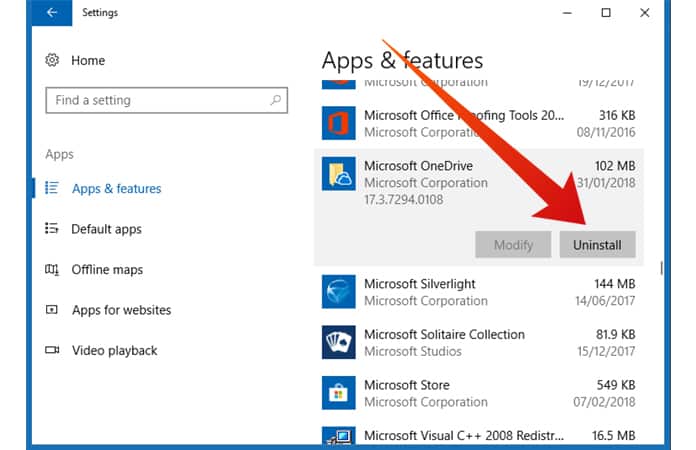
Step 3: Now, just click on the OneDrive app, from the two option Modify and Uninstall, click on the uninstall button. Hence, the process to uninstall OneDrive from Windows 10 will begin.
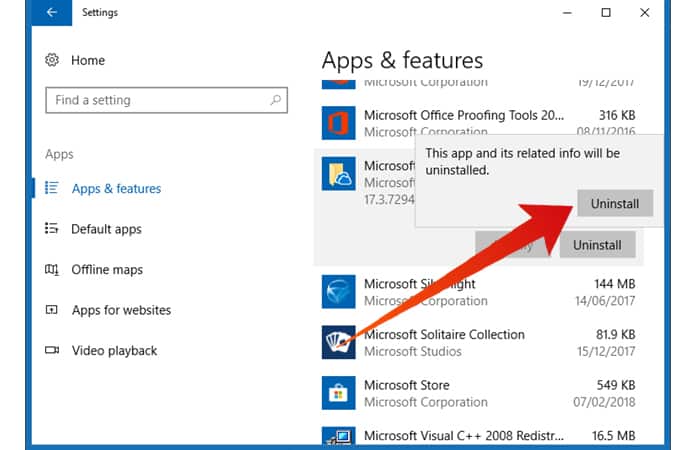
Step 4: A message will display This app and its related info will be uninstalled and it will ask whether you confirm or not. So to uninstall OneDrive from Windows 10 just click on the uninstall button one more time.
Step 5: Then, you might see another message from UAC, User Account Control, which will again ask for you confirmation. So just click on the Yes button to continue to uninstall OneDrive from Windows 10.
Wait a while, and now the Microsoft’s OneDrive app will be uninstalled completely from your system. You would not be able to find it in the File Explorer or anywhere on your device. Nonetheless, if you in the future want to install back the OneDrive app you can do so by following this link.
However, if you’re using Windows 8.1 you cannot uninstall OneDrive app. You would have to disable the option to store your data into OneDrive.
Steps to Disable OneDrive from Windows 8.1
Unpin the OneDrive app from your Start Menu by right clicking on it and then click on Unpin from Start. Next move to Settings, and open Change PC settings, from here just click on the OneDrive.
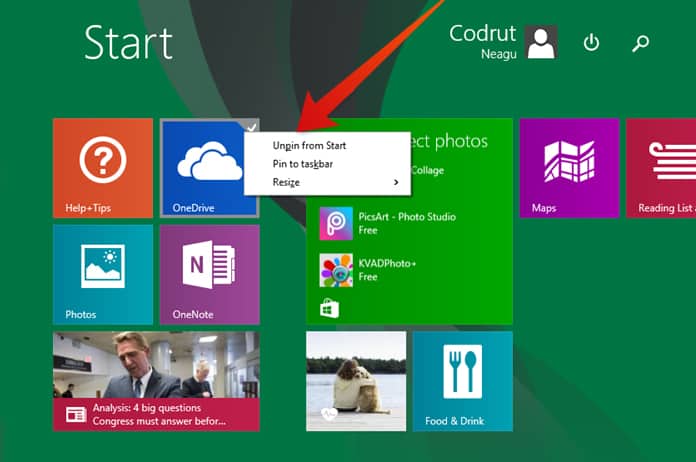
Now select the Turn Off option from the following section:
- File Storage
- Camera Roll
- Sync Settings
- Metered Connections – just disable all of the options
That’s it now you have just disable the OneDrive app on your Windows 8.1 device. In order to enable it back again just Turn On all the above mentioned sections. So removing the OneDrive from the Windows 8.1 can be a hassle. Therefore it is better to disable the OneDrive app on the Windows 8.1 because if you’ll completely delete it from the File Explorer, then it can cause some unforeseen problem in the Windows Registry.
Let us know in the comments below which is your favorite cloud storage service?


![30 Best Cydia Repo Sources For iOS 16/15/14 Jailbreak [2024] best cydia sources 2020](https://cdn.unlockboot.com/wp-content/uploads/2020/06/cydia-sources-13-100x70.jpg)